Mastering the Water Start: A Beginner's Guide to Kiteboarding Success

The water start is where kiteboarding truly begins. This post breaks down exactly how to get up on the board and riding—covering kite control, body positioning, timing, and the most common mistakes that keep beginners struggling in the water. Whether you've just finished lessons or keep sinking back down after popping up, you'll find actionable steps to get riding consistently.
What is the water start in kiteboarding?
The water start is the technique used to rise from floating in the water to standing upright on the board while the kite pulls you forward. It's the bridge between flying the kite and actually riding.
Unlike wakeboarding or waterskiing—where a boat provides steady, predictable pull—the water start depends entirely on your ability to generate power from the kite at exactly the right moment. Too little power and you won't rise. Too much, too fast and you'll get yanked face-first into the drink.
The maneuver happens in roughly three seconds. Your body starts floating horizontally, kite at twelve o'clock. You dive the kite, it catches wind, pulls you upward, and you edge the board against that pull to begin moving. Sounds simple. It's not—at least not at first.
What equipment do you need to learn water starts?
You don't need the most expensive gear to learn water starts, but having the right setup makes an enormous difference in how quickly you'll progress.
The kite. Beginners should use a kite between 10-12 meters, depending on body weight and wind conditions. Larger kites generate more power in lighter winds (12-16 knots), which helps when you're learning the timing. The Cabrinha Switchblade and Duotone Evo are both excellent choices—stable, predictable, and forgiving when you make mistakes.
The board. Bigger is better for learning. A board around 140-145 cm with plenty of width offers stability and planes earlier, meaning less power needed from the kite. The North Atmos Hybrid works well, though many schools use the Cabrinha XCaliber or Slingshot Misfit for students.
The use. A waist use gives better mobility for water starts (as opposed to seat uses). You'll need to twist your hips and shoulders independently—something seat uses restrict.
| Equipment | Beginner-Friendly Specs | Why It Helps |
|---|---|---|
| Kite Size | 10-12m (75-90kg rider) | More power in light wind, easier to relaunch |
| Board Length | 140-145 cm | More surface area = earlier planing, better balance |
| Board Width | 42-45 cm | Stability when standing, easier upwind riding |
| use Type | Waist (medium support) | Allows hip rotation, better kite control |
| Control Bar | 50-55 cm width | Responsive steering without being twitchy |
Worth noting: rent gear for your first 10-15 sessions. You'll outgrow beginner equipment quickly, and beat-up school kites can handle the crashes you'll inevitably deliver.
Why do beginners struggle with the water start?
Most beginners fail at water starts because of timing—specifically, trying to stand up before the kite has generated enough pull to support their weight.
Here's the thing. Your instinct screams "stand up now" the moment you feel any pull from the kite. That instinct is wrong. Standing too early shifts weight onto your back foot, the board digs in, and you stall. Or worse—you rise halfway, the kite hasn't reached the power zone yet, and you sink back down while the kite drifts to the edge of the window.
Another common issue: kite position. Beginners often dive the kite too vertically—straight down toward the water—instead of steering it across the wind window in a horizontal sweep. Vertical dives give a brief jerk, not sustained power. The result? A half-second of pull followed by nothing.
Body position matters too. Many learners keep their legs bent and pulled in toward their chest, like sitting in a chair. This doesn't work. The board needs to stay flat on the water's surface until you're fully upright. Bent knees push the board's edge down, creating drag.
The catch? There's a feedback loop at play. Failed water starts make you tired. Being tired makes you rush. Rushing makes you fail more. Breaking that loop means slowing down and focusing on technique over attempts.
How do you execute a proper water start step by step?
Follow this sequence exactly. Don't skip steps—each one builds on the last.
Step 1: Position the kite and board correctly
Start floating with the kite at twelve o'clock (straight above you). Your board should be perpendicular to the wind direction—roughly pointing across the wind, not downwind. Hold the board with your front hand on the board's edge, heelside rail digging slightly into the water.
Keep your body relaxed and horizontal. The board will want to float up and hit you in the face—let it rest against your shins instead.
Step 2: Dive the kite and generate power
This is where timing lives. Pull the bar in slightly (not all the way—maybe halfway) and steer the kite firmly toward the water in the direction you want to travel. For regular stance (left foot forward), dive the kite toward the left. For goofy (right foot forward), dive right.
The kite should move in a smooth arc—roughly from 12 o'clock down to about 45 degrees above the water. Think sweep, not stab.
As the kite moves, you'll feel pull building. Wait for it. Let the kite reach the power zone before doing anything else.
Step 3: Let the kite lift you
When the pull becomes strong—strong enough that you feel your hips lifting—allow your body to be pulled upward. Don't stand up. Don't pull your knees in. Let the kite's power bring your shoulders above your hips naturally.
Your back leg should extend slightly as the board comes under you. Keep the board flat on the water during this phase. Edge only after you're fully upright.
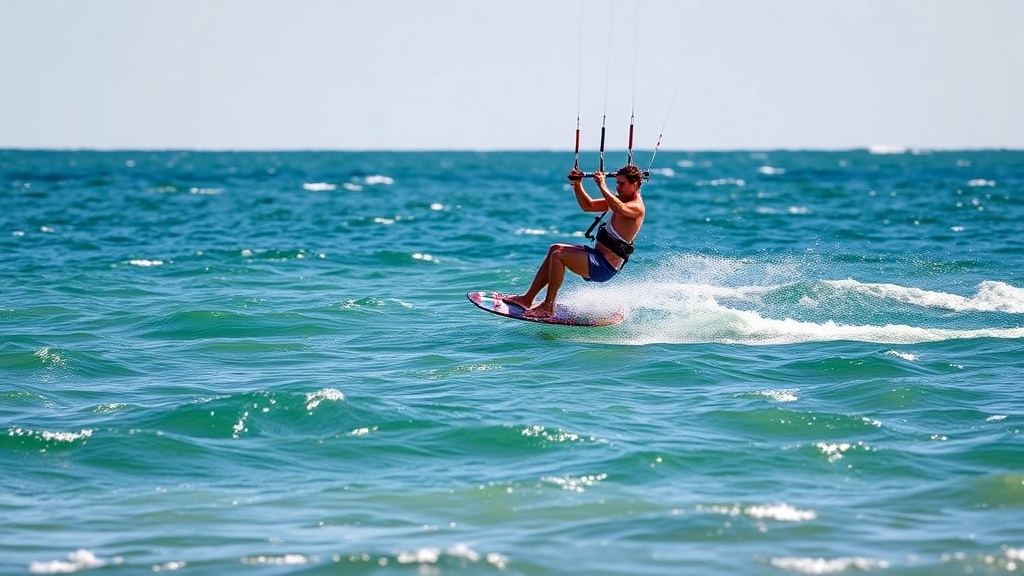
Step 4: Stand and edge
Once the kite has lifted you and your board is planing on the surface, stand up fully. Immediately edge the board heel-side—digging the heelside rail into the water—to resist the kite's pull and generate forward motion.
Steer the kite back up to about 45 degrees to maintain power. Look where you're going, not at the kite.
"The biggest mistake I see is people treating the water start like a pull-up. It's not about strength. It's about letting the kite do the work while you get out of the way."
What are common water start mistakes and how do you fix them?
Recognizing what you're doing wrong is half the battle. Here are the specific errors that keep beginners stuck.
Sinking immediately after popping up. You're probably sheeting out (pushing the bar away) as you stand. The kite loses power, you lose lift. Keep steady bar pressure through the entire motion.
Getting pulled over the board face-first. Classic sign of diving the kite too hard or with the bar pulled all the way in. Use a gentler dive, less bar pull. Think "firm guidance," not "emergency brake."
The board shoots upwind and you lose speed. You're edging too hard, too soon. Ease off the edge slightly until you're moving consistently. Build speed first, then edge harder for upwind progress.
Can't generate enough power to rise. Three possibilities: kite too small for conditions, board too small for your weight, or kite position too high in the window (not diving far enough). Try a bigger kite or practice diving lower in the window.
Feet slipping out of straps during the start. Your board position is wrong—probably angled too far downwind. Keep the board more across the wind. Also check strap tightness; snug but not circulation-cutting.
That said, even experienced riders botch water starts occasionally. Wind lulls happen. Waves hit at the wrong moment. Equipment fails. The difference between beginners and competent riders isn't perfection—it's recovery. Fall, reset, try again. Each attempt teaches something if you're paying attention.
Squamish Spit—just 45 minutes from Vancouver—offers some of the best flatwater learning conditions on the West Coast. The thermal winds blow consistently through summer afternoons, and the shallow sandy bottom makes recovering from failed starts less intimidating. If you're still struggling after multiple sessions, consider booking a lesson with IKO-certified instructors at the spit. Sometimes an outside eye catches what you can't feel.
Steps
- 1
Position Your Kite at 12 O'Clock and Float Your Board
- 2
Align Your Body and Point Your Board Downwind
- 3
Execute the Power Stroke and Extend Your Front Leg